Search This Blog

Thursday, December 31, 2009

Android ViewFlipper and SlidingDrawer

In my last post i talked about android selector mechanism and how to customize default GUI components apperances. another issue with mobile phone applications is limited displaying space, i mean if your application wants to go a bit further than a basic , simple application, it is almost gonna be impossible to fit all GUI options and features in a relatively small displaying space of mobile phones.

as we've already talked about it, the first option to solve this sort of problems is Menus and dialogs which are pretty easy to use and simple, but what if you need something more than that with higher level of customizability, that's when ViewFlipper and SlidingDrawer come into play(although they could be used for other purposes as well), like menus and dialogs they enable us to have some views hidden and show them when they are requested or when it's appropriate.
I'm gonna add a ViewFlipper and SlidingDrawer to my last application.

first of all let's see what a ViewFlipper is, ViewFlipper is Actually a View container which can hold different Views, but it shows just one of those Views at a time and hide others, you can switch between views manually or automatically, most interesting thing about ViewFlipper is that it uses two different Animations for flipping between views, one is used for outgoing View and the other one for incoming View.
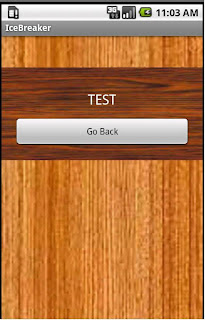
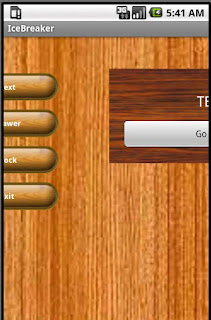
OK, here are some snapshots of what we are trying to achieve using a ViewFlipper:


There are two views between which we wanna flip, a ListView (Which we talked about it last time) and a simple view with a text and a button on it, When we press "Next" button our ListView will slide out and the other view will slide in and when "Go Back" button is pressed two views will be switched again.
our XML will be something like this :


<ViewFlipper android:id="@+id/flipper"
android:layout_width="fill_parent"
android:layout_height="fill_parent">


<FrameLayout android:layout_width="fill_parent"
android:layout_height="wrap_content"
android:layout_gravity="top"
android:layout_marginTop="50dip">

<ListView android:id="@+id/list"
android:layout_width="fill_parent"
android:layout_height="wrap_content"
android:dividerHeight="0dip"
android:divider="@null"
android:listSelector="@drawable/list_selector"
android:layout_gravity="center" />

</FrameLayout>


<LinearLayout android:layout_width="fill_parent"
android:layout_height="wrap_content"
android:orientation="vertical"
android:background="@drawable/wood01"
android:padding="20dip"
android:layout_gravity="top"
android:layout_marginTop="50dip">

<TextView android:layout_width="wrap_content"
android:layout_height="wrap_content"
android:text="TEST"
android:layout_gravity="center"
android:padding="15dip"
android:textSize="22dip"
android:textColor="@color/white" />

<Button android:text="Go Back"
android:id="@+id/back_btn"
android:layout_width="fill_parent"
android:layout_height="wrap_content" />


</LinearLayout>


</ViewFlipper>


As you can see our ViewFlipper has two children, a FrameLayout containing the ListView and a LinearLayout containing a TextView and a Button. by default the first child is shown when application comes up for the first time.
setting Animation for our flipper is pretty easy and straigh forward, here's the code I've used :


this.flipper = (ViewFlipper)findViewById(R.id.flipper);

Animation s_in = AnimationUtils.loadAnimation(this, R.anim.slidein);
Animation s_out = AnimationUtils.loadAnimation(this, R.anim.slideout);
this.flipper.setInAnimation(s_in);
this.flipper.setOutAnimation(s_out);


and here are the content of slidein.xml and slideout.xml respectively :


<?xml version="1.0" encoding="utf-8"?>

<set xmlns:android="http://schemas.android.com/apk/res/android"
android:interpolator="@android:anim/decelerate_interpolator">

<translate android:fromXDelta="-100%" android:toXDelta="0%" android:duration="1800" />

</set>


<?xml version="1.0" encoding="utf-8"?>

<set xmlns:android="http://schemas.android.com/apk/res/android"
android:interpolator="@android:anim/decelerate_interpolator">

<translate android:fromXDelta="0%" android:toXDelta="100%" android:duration="1800" />

</set>


All you need to do to switch the showing view manually is to use showNext() and showPrevious() methods of ViewFlipper class.
Another predefined Widget for hiding stuff is SlidingDrawer and its name pretty much suggests what it does. what does a drawer do!? it has a handle which is used to drag the drawer container out...obviously ;)
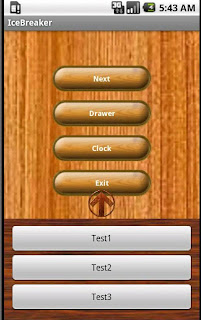
I added a simple SlidingDrawer to my application and you can see how it looks like below :
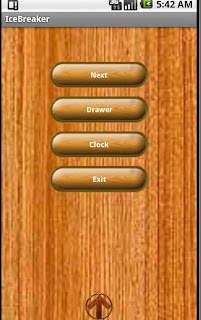


First of all, I should say sorry for this wierd object I used for my drawer's handle ;) I couldn't find anything better!!
here is the XML which is being used to create what you saw above:


<FrameLayout xmlns:android="http://schemas.android.com/apk/res/android"
android:layout_width="wrap_content"
android:layout_height="230dip"
android:id="@+id/frameLayout"
android:layout_gravity="bottom">

<SlidingDrawer android:layout_height="wrap_content"
android:handle="@+id/handle"
android:content="@+id/content"
android:id="@+id/slide"
android:orientation="vertical"
android:layout_width="fill_parent">


<ImageView android:layout_width="55dip"
android:layout_height="55dip"
android:id="@id/handle"
android:src="@drawable/arrow" />


<LinearLayout android:layout_width="wrap_content"
android:layout_height="wrap_content"
android:id="@id/content"
android:orientation="vertical"
android:background="@drawable/wood01"
android:padding="10dip">

<Button android:text="Test1"
android:id="@+id/Button01"
android:layout_width="fill_parent"
android:layout_height="wrap_content" />

<Button android:text="Test2"
android:id="@+id/Button02"
android:layout_width="fill_parent"
android:layout_height="wrap_content" />

<Button android:text="Test3"
android:id="@+id/Button03"
android:layout_width="fill_parent"
android:layout_height="wrap_content" />


</LinearLayout>
</SlidingDrawer>
</FrameLayout>


SlidingDrawer tag has two important attributes, android:handle and android:content; these attributes are actually references to other views which will be rendered as our drawer's handle and content. as you can see here we have two child views with the same id as specified for android:handle and android:content.

That's it. we are now familiar with two other useful Android widgets...

Wednesday, December 30, 2009

Android Selectors

GUI is always an important part of any application, because ordinary users dont know and don't care what's behind the scene; they want something easy to work with and nowadays attractive GUI is a must for most applications. although making an appealing and innovative interface needs something more than just programming skills and knowledge, every programmer should know how to customize different GUI components within whatever framework and environment they are working.
Today I'm gonna talk about one of the beautiful features of Android which gives you the ability to change the default behavior of GUI components.
when designing GUIs, most of the times you want to change the appearance of buttons, input Fields, menus and.... Android Selectors have been provided to solve all these kind of problems, they enable us to decide what to show and how to show based on different states of each components...for example you can tell a button to have black background color with red text color when it is in pressed state or whatever else.
In this post i will show you an example of customizing a ListView which is gonna look like this :


It is nothing but a simple ListView... believe me, and here is the XML which is being used to create it :


<ListView android:id="@+id/list"
android:layout_width="fill_parent"
android:layout_height="wrap_content"
android:dividerHeight="0dip"
android:divider="@null"
android:listSelector="@drawable/list_selector"
android:layout_gravity="center" />


the code which I've used to populate the list :


ListView view = (ListView)findViewById(R.id.list);
view.setAdapter(new ArrayAdapter(this, R.layout.menu_item, ITEMS));
view.setOnItemClickListener(this);


and finally, here is the content of menu_item.xml file :


<?xml version="1.0" encoding="utf-8"?>:


<TextView xmlns:android="http://schemas.android.com/apk/res/android"
android:layout_width="fill_parent"
android:layout_height="wrap_content"
android:textSize="12dip"
android:textStyle="bold"
android:paddingTop="20dip"
android:paddingBottom="20dip"
android:layout_gravity="center"
android:gravity="center"
android:background="@drawable/selector"
android:textColor="@drawable/color_selector"/>:


see? it's a simple, ordinary list, there is no secret here but a simple trick; I've used selectors for both background and text color for our TextView, what do you think "selector" and "color_selector" are?
they actually refer to selector.xml and color_selector.xml files inside drawable directory, you can see the content of them below :


<selector xmlns:android="http://schemas.android.com/apk/res/android">:
<item android:state_selected="true" android:drawable="@drawable/selector_s" />:
<item android:state_pressed="true" android:drawable="@drawable/selector_s" />:
<item android:drawable="@drawable/selector_d" />:
</selector>:


<selector xmlns:android="http://schemas.android.com/apk/res/android">:
<item android:state_selected="true" android:color="@color/black" />:
<item android:state_pressed="true" android:color="@color/red" />:
<item android:color="@color/white" />:
</selector>:


what does the content of color_selector file mean? it says that the text color will be black in "selected" state, red in "pressed" state and white otherwise, and i reckon now you should be able to figure out what the content of selector file means.
here is the content of selector_s and selector_d :


<bitmap xmlns:android="http://schemas.android.com/apk/res/android"
android:src="@drawable/pill"
android:gravity="center" />


<bitmap xmlns:android="http://schemas.android.com/apk/res/android"
android:src="@drawable/pill_s"
android:gravity="center" />


as you might have noticed,I've also used "listSelector" attribute of our ListView to customize the behavior of the list when user is going through options in the list.
list_selector.xml file looks like this :


<selector xmlns:android="http://schemas.android.com/apk/res/android">
<item android:state_focused="true" android:drawable="@drawable/wood01" />
<item android:drawable="@drawable/wood02" />
</selector>


and here are all the drawable objects i used in this application if you wanna give it a try and see how easy it works ;)


Sunday, December 20, 2009

Watch out your background thread!

The other day i came across something that i hadn't known before , do you
know that when you flip your android phone and go from portrait mode to landscape or vice versa, whatever application is running will be killed by android and recreated again?
It wouldn't be a problem as long as lifeCycle methods of your activity are implemented well, but what if you have a seperate thread which is working behind the scene and interact with your activity through a Handler, like what I have used in both WhitePage and YahooSearch applications. what happens? if you switch the screen mode while our Thread is working the activity is killed, but our Thread is abviously not notified about what has happend, so it will send the message through the old handler to the old activity which might be waiting for Garbage Collection or whatever else but it is not the activity which you wanted to send your message to.
so I've come up with this solution, I override onSaveInstanceState() method of activity class, it checks whether there is any unfinished task running, if so it locks the thread and save it, we also need to check if there is any saved thread in onCreate() method and unblock it with a new Handler class so that Messages will be delivered through the right Handler.(NOTE : we can also use onRetainNonConfigurationInstance() and getLastNonConfigurationInstance() methods which is apparently a better approach to solve this particular problem. ***Please see comments on this Post*** )


@Override
public void onCreate(Bundle savedInstanceState) {
.
.
.

if(savedInstanceState != null){
this.thread = (FetcherThread)savedInstanceState.getSerializable("thread");
this.thread.unlockIt(handler);
}
else{
this.thread = new FetcherThread(handler);
this.thread.start();
}

.
.
.

}

@Override
public void onSaveInstanceState(Bundle bundle){
super.onSaveInstanceState(bundle);
if(!this.thread.lastRequest_finished)
this.thread.lockIt();

bundle.putSerializable("thread", this.thread);
}


On the other side, in our Thread I added a new flag which is checked just before the thread wants to send a message back, if everything is alright it carries on and send a message, otherwise it will wait until it's notified that it is safe to send a message.


public void run(){

.
.
.

Bundle content = new Bundle();
content.putSerializable("result",results);
Message msg = new Message();
msg.setData(content);


while(!this.launcherReady){

try{
synchronized (this) {
this.wait();
}
}catch(InterruptedException exp){
////Just Nothing
}
}

this.callback.sendMessage(msg);

.
.
.

}


public synchronized void lockIt(){
this.launcherReady = false;
}

public synchronized void unlockIt(Handler newOne){
this.launcherReady = true;
if(newOne != null)
this.callback = newOne;
this.notifyAll();
}


you can also use Android AsyncTask class when you need a background task, which is a neat way to do it (if you will) , but be aware of the fact that it does not support the issue we discussed here by default. so you will still need to somehow handle it by yourself.

Saturday, December 19, 2009

When Android takes me beyond the time!!!

To be honest I cannot get this question out of my mind that what's gonna happen in future? i mean how do you envision our future? if you had asked someone(even a computer professional) about the future of internet and web just 15 years ago, they would have probably had no idea how powerful it was going to be. It is so funny but sometimes i have a feeling as if internet has always been around, i cannot remember what we used to do without internet back then.
Actually I believe the concept of computer is somehow getting mature, The first period was the wave of modern Operating Systems and the concept of GUI, say since early 80s till mid 90s; The second Wave was internet and the concept of remote services, roughly since mid 90s till now. and when you look around yourself you can smell the third wave, it has already begun...Mobile phones are no longer just a simple phone, you hear something like 1Ghz processor mobile phones with 256Mb Ram and you remember just 10 years ago when you were bragging about your new pentium3 PC which was just 600Mhz and you were lucky if you had 256 RAM!!!
and more importantly when you are coding using Android API and somehow get involved with this mobile application industry, you sometimes see something that was not more than a dream and fantasy just 5 years ago... but not anymore.

I envision a future in which ordinary computer users wouldn't need a big PC (by PC I mean any kind of Personal Computer regardless of its OS) or Laptop to get what they want, all they need would be achievable using their mobile phones, and nobody will even bother themselves to use these boring, old-fashion devices unless you are a professional user or you might say a gamer ;) .
But what's gonna happen for pc? Will it just die out? I dont think so....I think we will see a revolution! When smart phones are able to do what a PC can, it is a sign that something should get changed...step up time.
But how? I bet you ,like anyone else i know, use your computer mostly to get different types of remote services either web-based or not....it means GUI and Remote services are paying off, but it is so heavy weight, have you ever felt this? actually we're all feeling that and that's why we go and buy ourselves a smart phone; checking your email, chatting with your friends, Twitter, Facebook, Flicker ,Google maps , GPS applications, Bluetooth applications, taking high quality pictures, recording video, browsing through web and you can also give a call to a friend if it is necessary...all of these services and capabilities with a device as big as your palm...and that is what I'd like to call it Technology Transparency...if the first wave was the concept of GUI and Human computer interaction and the second one was Web and Remote services ,I would say the third one is the concept of Mobility and Technology Transparency.
Users by no means want to get dependent or limited, they want to get what they want whenever, wherever without any hassle, and that's why we need wireless communication...nobody is willing to figure out which wire should go where or what is the difference between this and that kind of sockets....and that is the reason behind Wireless sensor networks, we want to use some tiny sensors and just chuck them somewhere and without any configuration or any hassle they start serving us...and that is why we love smart phones, we don’t like to have to go to some particular place to get access to some basic services, we just want to pull our phone out of our pocket ,of course a touch screen one because button is not transparent enough!!, and get what we want... boundless and transparent services.

when you analyse all these facts you get the impression that Chrome OS concept is a pretty possible candidate for future PCs, current PCs structure and Their operating systems are too difficult to deal with and a real headache for ordinary users who want to get some benefit out of it as fast and transparent as possible, having said that and taking account of this fact that high speed internet connections are becoming available for anyone and thank to Web2.0(which is a good example of Technology Transparency itself) many software giants have started or at least have been considering to provide an online versions of their products which means you would no longer need to have a Microsoft office, Adobe reader or Winamp installed on your local computer, although you might need them on you mobile phone and could have them installed there...
Fair enough, so you will not need a HD when you don’t want to install any software unless you need to store something, interestingly enough there are already some web-based services which allow you to store your stuff. all these things means that you would be able to get rid of your old-fashion OS (specially because you are already dealing with one on your mobile phone) and your HD and any hassle related to them such as organizing issues and security issues and let it to be taken care of by someone else(Transparently).
all you will need is a high speed connection and a OS which works as a gateway between your computer and infinite online services out there, I also think we will need something more than web and html, we will need some layer on top of web or at least beside it to make the whole thing more smooth and accessible (I mean Transparent ;) ).
That’s how I envision our future and what i call it Mobility and Technology Transparency wave. What’s your thought? How do you envision our future? and why?


Friday, December 18, 2009

WhitePage Application_Adding a new contact in Android 2.0

Actually i was gonna talk about HTML parsing mechanism which i used for my Whitepages application,but i thought it wouldn't be such a good idea to talk about it on this weblog since it has nothing to do with android and I just did it to fulfill my curiosity. the only thing we need to know is how to make our query which in this case was a simple GET query and then identify how data is wrapped inside HTML tags which can be easily done thanks to FireBug plugin, the rest will be some effort to figure out a good algorithm to extract data from HTML document as efficient as possible...
What i would like to talk about in this post is Contacts in android and how to add a new Contact to Android's Contact List. Initially i thought it was gonna be a simple thing to do but i gotta admit it, it was the first time i felt
a bit confused since I started android development. what happened was i wanted to write a piece of code to add a new contact when user selects one of our application menu options, I went to Android developers website(like i usually do) to find some clues on how to do that... as you might have already noticed there are some examples in Content Providers section about how to work with Contacts using People class, good, i was pretty sure that i got it... but when i started coding,Eclipse warned me that People class was deprecated... Beautiful!!!so what am i supposed to do if i shouldn't use People class, I was thinking with myself... having a look at People class documentation I found out that it's been replaced by a totally different mechanism and we should use another class called ContractsContact to interact with Contacts...
one of the things that struck me was the fact that there are more than two dozens classes and interfaces in android.provider package marked as deprecated and a completely different approach has been introduced for interacting with contracts since API level 5. this new API gives you a great level of flexibility and extensibility but as we all know everything has a price, if you want a flexible and extensible framework, no worries, but it comes with a bit more complexity, and I think it could be why they still prefer to stick with People class examples... ;)
Fair enough, here is the code that i used in our application to add a new Contact according to what user has already selected :


try{


ArrayList op_list = new ArrayList();
int backRefIndex = 0;
op_list.add(ContentProviderOperation.newInsert(RawContacts.CONTENT_URI)
.withValue(RawContacts.ACCOUNT_TYPE, null)
.withValue(RawContacts.ACCOUNT_NAME, null)
.build());

op_list.add(ContentProviderOperation.newInsert(Data.CONTENT_URI)
.withValueBackReference(Data.RAW_CONTACT_ID, backRefIndex)
.withValue(Data.MIMETYPE, StructuredName.CONTENT_ITEM_TYPE)
.withValue(StructuredName.DISPLAY_NAME, this.selectedItem.getName())
.build());

op_list.add(ContentProviderOperation.newInsert(Data.CONTENT_URI)
.withValueBackReference(Data.RAW_CONTACT_ID, backRefIndex)
.withValue(Data.MIMETYPE, StructuredPostal.CONTENT_ITEM_TYPE)
.withValue(StructuredPostal.FORMATTED_ADDRESS, this.selectedItem.getAddress())
.build());

op_list.add(ContentProviderOperation.newInsert(Data.CONTENT_URI)
.withValueBackReference(Data.RAW_CONTACT_ID, backRefIndex)
.withValue(Data.MIMETYPE, Phone.CONTENT_ITEM_TYPE)
.withValue(Phone.NUMBER, this.selectedItem.getPhone())
.withValue(Phone.TYPE, Phone.TYPE_HOME)
.withValue(Phone.LABEL, "")
.build());

ContentProviderResult[] result = getContentResolver().applyBatch(ContactsContract.AUTHORITY, op_list);


}catch(OperationApplicationException exp){

exp.printStackTrace();

}catch(RemoteException exp){

exp.printStackTrace();
}


dont freak out ;) , although it might seem quite different than what you are familiar with, it's mostly because i used Batch insert technique and ContentProviderOperation.Builder class which have been introduced in API level 5.
you can still use getContentResolver().insert() and ContentValue objects but it is recommended to use new batch technique over traditional insert and update method.
what is important here is that you first need to create a RawContact and then use its ID to add some data like name, phone number and address, in traditional method you would need to insert a RawContact, get its ID and then use that ID in subsequent operations, I used withValueBackReference() method here which has been provided for handling these sort of cases when you are using batch technique.
You can find some good information about this whole thing in Data class documentation.


Sunday, December 13, 2009

WhitePage Application_Part 2

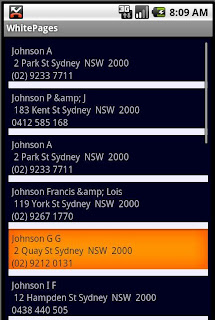
In my last post we saw how the main page of our application works, in this post we will be discussing some other features of our application. if you remember, the result of our search is shown in a page like this:


I've used ListView for this page and here is our layout file for this page :


<?xml version="1.0" encoding="utf-8"?>
<LinearLayout xmlns:android="http://schemas.android.com/apk/res/android"
android:orientation="vertical"
android:layout_width="fill_parent"
android:layout_height="fill_parent"
android:baselineAligned="true">

<LinearLayout xmlns:android="http://schemas.android.com/apk/res/android"
android:id="@+id/resultLayout"
android:orientation="vertical"
android:layout_width="fill_parent"
android:layout_height="fill_parent"
android:baselineAligned="true"
android:background="@color/black"
android:layout_margin="2dip"
android:scrollbars="horizontal">


<ListView android:text=" text "
android:id="@+id/listView"
android:minWidth="70dip"
android:layout_height="fill_parent"
android:layout_width="fill_parent"
android:padding="5dip"
android:divider="@color/white"
android:dividerHeight="10dip"/>


</LinearLayout>

</LinearLayout>


it's pretty simple,isn't it? what we need to know is how to tell to a ListView to show whatever we want to show and and how to format it. in our case after each search we will have an array of Result class, Result objects are simple POJOs which have a name, address and a phone number,we also want to show our result is three different lines(you might need to show an image in each row or have a more complicated structure for each row).
ListView uses something called ListAdapter to get all data needed to be shown and know how to show it, there are some predefined subclasses of ListAdapter such as ArrayAdapter, CursorAdapter and SimpleAdapter which provide some convenient methods for interacting with data for some frequently used mechanisms such as XML Documents or Database.
We can also customize these Adapters by simply inheriting from them and extending their behavior and that's what I've done here.
you can see our extended Adapter below :


private class MyAdapter extends ArrayAdapter {

private Activity context;

public MyAdapter(Result[] items){
super(MainActivity.this, R.layout.item,items);
this.context = MainActivity.this;
}

@Override
public View getView(int position,View convertView,ViewGroup parent){

LayoutInflater inflater= this.context.getLayoutInflater();
View row=inflater.inflate(R.layout.item, null);

TextView name = (TextView)row.findViewById(R.id.name);
TextView loc = (TextView)row.findViewById(R.id.location);
TextView phone = (TextView)row.findViewById(R.id.phone);

Result temp = (Result)getItem(position);

name.setText(temp.getName());
loc.setText(temp.getAddress());
phone.setText(temp.getPhone());

return row;
}

}


getView() method is our key method here, it is sent the position of a row in ListView and it's responsible to return a View Object representing that row which will be shown by ListView later. it is really cool because you can use
a View object and it means that you will be able to literally do whatever you want, i mean it would give you a great opportunity over how much you can customize your rows in ListViews.(we forget some basic concepts of OOP sometimes,
or should i say we underestimate how significant they could be, one of these basic concepts is Polymorphism...just look how nice it works here.... anyway just thought it'd be worthwhile to mention it ;) ).

Like any other View Objects we've created so far we can either use XML layout file or just hard code it. i used the first approach here, my layout file's name is item.xml and it looks like this :


<?xml version="1.0" encoding="utf-8"?>
<LinearLayout xmlns:android="http://schemas.android.com/apk/res/android"
android:orientation="vertical"
android:layout_width="fill_parent"
android:layout_height="fill_parent"
android:baselineAligned="true">


<LinearLayout xmlns:android="http://schemas.android.com/apk/res/android"
android:orientation="vertical"
android:layout_height="wrap_content"
android:layout_marginLeft="5dip"
android:layout_marginRight="5dip"
android:layout_marginTop="5dip"
android:layout_gravity="left"
android:layout_width="wrap_content">

<TextView android:text="Name"
android:id="@+id/name"
android:layout_width="wrap_content"
android:layout_height="wrap_content"
android:minWidth="70dip"/>

<TextView android:text="Location"
android:id="@+id/location"
android:layout_width="wrap_content"
android:layout_height="wrap_content"
android:minWidth="70dip"/>

<TextView android:text="PhoneNumber"
android:id="@+id/phone"
android:layout_width="wrap_content"
android:layout_height="wrap_content"
android:minWidth="70dip"/>


</LinearLayout>


</LinearLayout>


OK, let's get back to our getView() method that might seem a bit confusing....but it's not, believe me ;) .
all we need to do is to convert our layout file into a View Object, actually it's not a new thing...it's done in our all application but behind the scene. All we need to do is to get an instance of LayoutInflater object using getLayoutInfalter() method of Context class (Our Activity) and call inflate() method.once we have our view we can get the Result Object in that position and then fill our Textviews with appropriate data.

remember that each time that user does a search and there is any Result for that search we use the following code to renew our data in ListView :

listview.setAdapter(new MyAdapter(results));


I'm not sure whether it's a good way to do this though. ;)

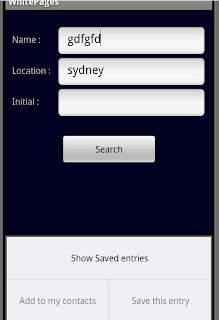
The last thing I'm gonna talk about is menus and how to use them in our applications. we've got a menu with three options in our application but two options must be disabled unless we are in Result page, if user presses their phone menu button they will see something like this depending on which page they are currently in :


to achieve this we need to override three methods of Activity class which you can see below :


@Override
public boolean onCreateOptionsMenu(Menu menu) {

menu.add(0, 1, 0, "Show Saved entries");
menu.add(0, 2, 0, "Add to my contacts");
menu.add(0,3,0,"Save this entry");
return true;

}

@Override
public boolean onPrepareOptionsMenu(Menu menu){
//menu items are disable when we are in the main page...
for(int i=1;i<3;i++){
menu.getItem(i).setEnabled(!this.main);
}

return true;
}


@Override
public boolean onOptionsItemSelected(MenuItem item){

int id = item.getItemId();
this.selectedItem = (Result)view.getSelectedItem();

switch(id){

case 1 : showSavedData();
break;
case 2 : addToContact();
break;
case 3 : saveItem();
break;

default : assert false : "Invalid Options!";

}

return true;
}


I also want to have another menu which shows our options when user clicks on one of our result items in ViewList, we would need to be able to get notified when an item is clicked, ListView class has a setOnItemClickedListener() method which gets an instance of OnItemClickListener class this class has a callback method named onItemClicked(), you can see my implementation of this method here :


public void onItemClick(AdapterView adapter, View arg1, int position, long arg3) {

CharSequence[] options = {"ADD TO CONTACTS","SAVE THIS ENTRY"};

this.selectedItem = (Result)adapter.getItemAtPosition(position);

if(this.resultOptions == null){
AlertDialog.Builder builder = new AlertDialog.Builder(MainActivity.this);
builder.setTitle("Options");
builder.setItems(options, new DialogInterface.OnClickListener() {

@Override
public void onClick(DialogInterface dialog, int which) {
// TODO Auto-generated method stub

if(which == 0)
addToContact();
else
saveItem();

dialog.cancel();
}
});

this.resultOptions = builder.create();
}

this.resultOptions.show();

}


so when user clicks on any item they will be shown something like this :


I will talk about WhitePageExtractor class that has been used to extract our data from www.whitepages.com.au and also I'm gonna figure out how to work with phone contacts and add a new contact in my next post...

Thursday, December 10, 2009

WhitePage Application_Part One

Before starting i gotta say something, Android is amazing...i mean more you work with it more you understand how well designed this Google's creature is. i had a painful experience with J2ME a couple of years ago and i cannot forget how frustrating it was. although i am a Java lover, i think we should admit that there is no light at end of J2ME tunnel.
Android on the other hand is really fascinating; beautiful API, comprehensive documentation and snappy simulator; what else would someone expect from a good framework?

Ok...let's get down to our business, in my last post I talked about html data extraction and said I would develope an application to do what exactly www.whitepages.com.au is doing...I have done it and I'm gonna be talking about this application in a few next posts.
I have examined some of basic android GUI capabilities such as menus,dialogs,List view and simple animations which will be discussed in this post and next post, remember that codes that are provided here should not be considered as the best possible way to do stuff...they are just examples for me and you to get familiar with this whole thing...

anyway,our application main page looks like this :


if you wanna have a good looking GUI in both portrait and landscape modes, there are two possibilities, either design your layout in a flexible fashion to support both modes or use a seperate layout file for each mode(default layout directoryfor portrait mode and "layout-land" directory which will be used for landscape mode, so if you need a different layout for
landscape mode just put your landscape specific designed file in "layout-land" instead of "layout" directory).
I used a single layout file since our GUI is simple and i could manage to have a dynamic GUI using a single layout file :


<?xml version="1.0" encoding="utf-8"?>
<LinearLayout xmlns:android="http://schemas.android.com/apk/res/android"
android:orientation="vertical"
android:layout_width="fill_parent"
android:layout_height="fill_parent"
android:baselineAligned="true">

<LinearLayout xmlns:android="http://schemas.android.com/apk/res/android"
android:id="@+id/mainLayout"
android:orientation="vertical"
android:layout_width="fill_parent"
android:layout_height="fill_parent"
android:baselineAligned="true"
android:background="@color/black">


<LinearLayout xmlns:android="http://schemas.android.com/apk/res/android"
android:orientation="horizontal"
android:layout_height="wrap_content"
android:layout_marginLeft="5dip"
android:layout_marginRight="5dip"
android:layout_marginTop="25dip"
android:layout_width="wrap_content"
android:layout_gravity="center">

<TextView android:text="Name : "
android:id="@+id/NameLable"
android:layout_height="wrap_content"
android:layout_width="wrap_content"
android:minWidth="70dip"/>

<EditText android:text=" "
android:id="@+id/name"
android:layout_width="wrap_content"
android:layout_height="wrap_content"
android:maxWidth="400dip"
android:gravity="top"
android:minWidth="230dip"></EditText>


</LinearLayout>

<LinearLayout xmlns:android="http://schemas.android.com/apk/res/android"
android:orientation="horizontal"
android:layout_height="wrap_content"
android:layout_marginLeft="5dip"
android:layout_marginRight="5dip"
android:layout_gravity="center"
android:layout_width="wrap_content">

<TextView android:text="Location : "
android:id="@+id/locationLabel"
android:layout_width="wrap_content"
android:layout_height="wrap_content"
android:minWidth="70dip"/>

<EditText android:text=" "
android:id="@+id/location"
android:layout_width="wrap_content"
android:layout_height="wrap_content"
android:maxWidth="400dip"
android:gravity="top"
android:minWidth="230dip"></EditText>


</LinearLayout>


<LinearLayout xmlns:android="http://schemas.android.com/apk/res/android"
android:orientation="horizontal"
android:layout_height="wrap_content"
android:layout_marginLeft="5dip"
android:layout_marginRight="5dip"
android:layout_width="wrap_content"
android:layout_gravity="center">

<TextView android:text="Initial : "
android:id="@+id/initialLabel"
android:layout_width="wrap_content"
android:layout_height="wrap_content"
android:minWidth="70dip"/>

<EditText android:text=" "
android:id="@+id/initial"
android:layout_width="wrap_content"
android:layout_height="wrap_content"
android:maxWidth="400dip"
android:gravity="top"
android:minWidth="230dip"></EditText>


</LinearLayout>


<LinearLayout xmlns:android="http://schemas.android.com/apk/res/android"
android:orientation="horizontal"
android:layout_height="wrap_content"
android:layout_marginLeft="5dip"
android:layout_marginRight="5dip"
android:layout_marginTop="25dip"
android:layout_width="wrap_content"
android:layout_gravity="center">

<Button android:text="@string/searchBtn"
android:id="@+id/search"
android:layout_height="wrap_content"
android:gravity="center_horizontal|center"
android:layout_width="150dip"></Button>

</LinearLayout>

</LinearLayout>

</LinearLayout>


when user presses search button, if our thread cannot find any result, a dialog will be shown to user telling him no result have been found :


Using dialogs in Android is pretty easy and straight forward, all you need to do is to use AlertDialog.Builder class to create
your Dialog instance, once you have your Dialog instance created, you can show it or hide it whenever you want, below is
our code for our dialog you just saw :


if(results == null || results.length == 0){
if(alertDialog == null){
AlertDialog.Builder builder = new AlertDialog.Builder(MainActivity.this);

builder.setMessage("No Result Could be found").setNeutralButton("OK",
new DialogInterface.OnClickListener() {


@Override
public void onClick(DialogInterface dialog, int which) {
dialog.cancel();
}

});

MainActivity.this.alertDialog = builder.create();

}

alertDialog.show();


you can also use setPositiveButton() or set NegativeButton() just like setNeutralButton() if you need to have yes/no or agree/disagree buttons.


Obviously there will be a time gap between user presses the search button and when the data extraction process gets finished because we are getting our data using network. it is usually a good practice to show users that something is happening behind the scene specially when delay is likely to be more than 1 or 2 seconds...thankfully Android has taken care of this issue... when search button is pressed we will start our thread to extract data and then we simply
use following code :


ProgressDialog.show(this, "","Please wait...", true);


show() method returns an instance of ProgressDialog class which can be used to interact with the showing dialog, in this case we will call cancel() method later when the process finishes.

after calling show() method our application will be looking like this :


Fair enough, we have already handled the situation where there is no result, but what happens when there is some results?
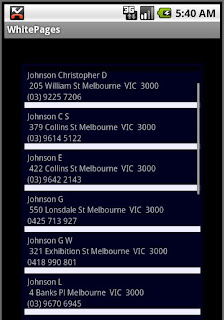
I've used Android ListView to show the result to users :


I'm gonna talk about ListView class and how to use it in a customized manner next time. what I'm gonna talk about right now is how to use Animation in android,it's not gonna be comprehensive but it is a simple example which has helped me to have a better understanding of Animation handling mechanism in Android and hopefully it will be helpful for you as well.
Actually when search button is pressed current page(containing Text Feilds and search button) does not just simply replace by result page but it will start to rotating and shrinking until it completely disappears and then Result page
gradually replaces previous page...


Initially i thought it was gonna be so tricky and chalenging given the fact that this sort of stuff had always been a big headache for me but once again I impressed by Android capabilities and how well this API has been designed.
one of the most interesting things which i hadn't realized before but we all gotta know is startAnimation() method of View class. yes...simple as this, all Views have a startAnimation() method which has an Animation Object as input parameter and can be called whenever you want to apply an animation on a view.
you can create animation objects problematically or using XML file, I've used the latter.
here is the XML file which is used to animate our application's main page after search button get pressed :


<?xml version="1.0" encoding="utf-8"?>

<set xmlns:android="http://schemas.android.com/apk/res/android" android:shareInterpolator="false">
<scale
android:interpolator="@android:anim/accelerate_decelerate_interpolator"
android:fromXScale="1.0"
android:toXScale="0.8"
android:fromYScale="1.0"
android:toYScale="0.6"
android:pivotX="50%"
android:pivotY="50%"
android:fillAfter="false"
android:duration="500" />


<set android:interpolator="@android:anim/decelerate_interpolator">
<scale
android:fromXScale="0.8"
android:toXScale="0.0"
android:fromYScale="0.6"
android:toYScale="0.0"
android:pivotX="50%"
android:pivotY="50%"
android:startOffset="700"
android:duration="700"
android:fillBefore="false" />
<rotate
android:fromDegrees="0"
android:toDegrees="-60"
android:toYScale="0.0"
android:pivotX="50%"
android:pivotY="50%"
android:startOffset="700"
android:duration="700" />
</set>
</set>


as you can see we used three different animation effects, two Scale animation and one Rotate Animation, there are two more animation types that can be used as well, Alpha animation (<alpha> tag) and Translation animation (<translate> tag). you can use <set> tags to combine two or more animation instances, you can also use nested <set> tags like I have used in this example(actually i sorta pinched this XML file from Android API Demo ;) ).
first our view gets shrunk from its original size (1.0X,1.0X) to (0.8X,0.6X), it will take 500 milliseconds to finish, then after 200 milliseconds shrunk view starts to rotating and shrinking simultaneously until it disappears (0.0X.0.0X).

for Resultpage i used a simple animation :


<?xml version="1.0" encoding="utf-8"?>


<set xmlns:android="http://schemas.android.com/apk/res/android"
android:interpolator="@android:anim/decelerate_interpolator">
<scale
android:fromXScale="0.1"
android:toXScale="1.2"
android:fromYScale="0.1"
android:toYScale="1.2"
android:pivotX="50%"
android:pivotY="50%"
android:duration="800"
android:fillBefore="false" />

</set>


and here is the code that has been used to run these two animation and replace main view by result view :


LinearLayout LL = (LinearLayout) findViewById(R.id.mainLayout);
Animation animation = AnimationUtils.loadAnimation(MainActivity.this,R.anim.effect);
Animation reverse = AnimationUtils.loadAnimation(MainActivity.this,R.anim.reverse);

LL.startAnimation(animation);
resultPage.startAnimation(reverse);


animation.setAnimationListener(new AnimationListener() {

@Override
public void onAnimationStart(Animation animation) {
// TODO Auto-generated method stub

}

@Override
public void onAnimationRepeat(Animation animation) {
// TODO Auto-generated method stub

}

@Override
public void onAnimationEnd(Animation animation) {

setContentView(resultPage);
main = false;

}
});


Friday, December 4, 2009

What do you think?

One of the interesting facts about mobile phones is that although they provide Internet browsers but users (I mean all of us) are reluctant to use it, i dont know exactly why, maybe because phone browsers are not efficient enough...but i feel it has something to do with the perception of mobile phones in our minds and also the fact that people tend to expect applications on mobile phones simpler and easier to deal with than PC applications.
that's why there are heaps of application out there providing some services to users which has already been available on the WEB.you probabaly have some applications like Youtube or Flicker client installed on your mobile phone or some widgets like Weather Forecast or Web Search. they are actually just a neaty, easy to use,integrated and graphically more attractive version of some well known Web-Based Services.

I was talking with one of my friends the other day, he has an iPhone and he showed me a couple of applications which he had downloaded before, among them were a few applications that all they were doing was to go and parse the HTML code of a Website, extract what they want and show them to users in a bit more appealing fashion, plus they had some new and kind of innovative extra options which cannot be done when you are using a web browser.
initially I was thinking it would be ridiculous to spend some time and effort to extract some information out of HTML code of another site and show it to people when they can go straight to the originall Web site.but my friend convinced me that it's actually a pretty good idea, he showed me the Rate of the application and talked about how handy it was for him and why he prefered using this application rathar that going to original web site...YES...he really tempted me to give it try....

In the first glance the whole thing might seem a bit dodgy and sneaky, parsing the HTML code of a site and use it to make another application which is actually doing the same thing....but the reallity is that it is a kind of WIN-WIN situation for everyone...if there is a Web site out there Willing to serving users and because of whatever reasonthey haven't got a decent Mobile Phone interface for their services what would be more delightful than having
someone else develope it for you for FREE...


Fair enough...but why am i talking about these stuff?....actually i am just trying to adjust what i am about to start to do.. ;)
yes..i'm gonna develope an application which will be doing exactly what www.whitepages.com.au is doing. and most challenging part of this application will probabely be how to extract required information out of HTML page since i have had no experience in this area so far...sounds like Fun...doesn't it? ;)
I have also decided to design a bit more better GUI for next application, although it's always been a real headache to me.
But the truth is even if you have a most reliable,secure and efficient system with a crappy GUI, no one is gonna use that...

anyway let me know what you think about the whole HTML data extraction thing, have got any application like the one my friend had?which features were there which made you think it'd better to use it rather than going to originall website?
or how many times did you say 'I wish i could do this' when you were visiting a website through your phone browser and felt like you stuck with a isolated tool which cannot be integrated with other facilities of your SMART Phone?

Wednesday, December 2, 2009

Pull Parser

Although our last application is working pretty good with SAX Parser, but as i said i'm gonna use Pull Parser instead, to see how it works, as far as i know Pull Parsing is a bit slower that SAX parsing but it gives the ability to stop parsing in the middle of a document and this means that Pull Parsing would be well suited in a situation in which we just need some portions of XML and not the whole of it.
In our application we need the whole xml but i think now that we are dealing with XML parsing it would be a good opportunity to dig into PullParser method and draw a comparison between these two XML parsing methods.(you can also use DOM parsing, but i reckon it's safe to say that you shouldn't ever use it unless you really have to).
Here is our Pull Parser class:


package com.news.search;

import java.io.InputStream;
import java.util.ArrayList;
import java.util.HashMap;
import java.util.List;
import java.util.Map;

import org.xmlpull.v1.XmlPullParser;
import android.util.Xml;

import com.yahoo.search.ImageThumbnail;
import com.yahoo.search.NewsSearchResult;
import com.yahoo.search.xmlparser.XmlParserImageThumbnail;
import com.yahoo.xml.XmlParser;


public class NewsPullParser {

private InputStream input;

public final static String TITLE = "Title";
public final static String SUMMARY = "Summary";
public final static String URL = "Url";
public final static String CLICK_URL = "ClickUrl";
public final static String SOURCE = "NewsSource";
public final static String SOURCE_URL = "NewsSourceUrl";
public final static String LANGUAGE = "Language";
public final static String PUBLISH_DATE = "PublishDate";
public final static String MOD_DATE = "ModificationDate";
public static ArrayList newsTags;
static{
newsTags = new ArrayList();
newsTags.add(TITLE);
newsTags.add(SUMMARY);
newsTags.add(URL);
newsTags.add(CLICK_URL);
newsTags.add(SOURCE);
newsTags.add(SOURCE_URL);
newsTags.add(LANGUAGE);
newsTags.add(PUBLISH_DATE);
newsTags.add(MOD_DATE);
}


public NewsPullParser(InputStream stream){
this.input = stream;
}

public NewsSearchResult[] parse(List TagFilter) throws Exception{

ArrayList content = null;
XmlPullParser parser = Xml.newPullParser();

try{

parser.setInput(this.input,"UTF-8");
HashMap map = null;
int event = parser.getEventType();

while (event != XmlPullParser.END_DOCUMENT){
String name = null;

switch (event){

case XmlPullParser.START_DOCUMENT: content = new ArrayList();
break;
case XmlPullParser.START_TAG:
name = parser.getName();
if (name.equalsIgnoreCase("Result")){
map = new HashMap();
}else if(map != null && newsTags.contains(name) && TagFilter.contains(name)){

map.put(name,parser.nextText());

}
break;

case XmlPullParser.END_TAG:
name = parser.getName();
if (name.equalsIgnoreCase("RESULT") && map != null)
content.add(new PullParserNewsSearchResult(map));

break;
}

event = parser.next();
}


}catch(Exception exp){
throw exp;
}

return content.toArray(new NewsSearchResult[content.size()]);
}


private class PullParserNewsSearchResult implements NewsSearchResult {
private Map result;


public PullParserNewsSearchResult(Map result) {
this.result = result;
}

public String getTitle() {
return (String)result.get(TITLE);
}

public String getSummary() {
return (String)result.get(SUMMARY);
}

public String getUrl() {
return (String)result.get(URL);
}

public String getClickUrl() {
return (String)result.get(CLICK_URL);
}

public String getNewsSource() {
return (String)result.get(SOURCE);
}

public String getNewsSourceUrl() {
return (String)result.get(SOURCE_URL);
}

public String getLanguage() {
return (String)result.get(LANGUAGE);
}

public String getPublishDate() {
return (String)result.get(PUBLISH_DATE);
}

public String getModificationDate() {
return (String)result.get(MOD_DATE);
}

public ImageThumbnail getThumbnail() {
return null;
}
}


}


I added some kind of filtering to our parsing process because I though it was so silly to extract all those values and store them in memory without even using them.so let's just store those information that is required and
simply just skip those ones we are not interested in.

Our FecherThread's run() method will also gotta be changed :


public void run(){

request.getParameters().put("appid", "javasdktest");
// request.setResults(15);


do {
while(!this.anyRequest){

try{
synchronized (this) {
this.wait();
}
}catch(InterruptedException exp){
////Just Nothing
}

}

try{

NewsPullParser parser = new NewsPullParser(RestClient.call(request.getRequestUrl(), request.getParameters()));
ArrayList filter = new ArrayList();
filter.add(NewsPullParser.TITLE);
filter.add(NewsPullParser.SUMMARY);

Bundle content = new Bundle();
content.putSerializable("result",parser.parse(filter));
Message msg = new Message();
msg.setData(content);
this.callback.sendMessage(msg);


}catch(Exception exp){
exp.printStackTrace();

}


this.anyRequest = false;
this.lastRequest_finished = true;

}while(!this.stopFlag);

}


we can also get rid of executeAndParse() method since we no longer need it.
Done,that's it.... easy, wasn't it? now we are familiar with both SAX Parsing
and Pull Parsing in Android.